How to Use the IFS Function in Excel: Usabilities, Examples, and Writing Steps
Home >> Excel Tutorials from Compute Expert >> Excel Formulas List >> How to Use the IFS Function in Excel: Usabilities, Examples, and Writing Steps
In this tutorial, you will learn how to use the IFS function in excel optimally.
When working in excel, we might sometimes need to evaluate logic conditions in phases to get the result we want.
If we use the excel version prior to excel 2019, we can use nested IFs for that. However, doing it with this method can be complicated, especially if we have many logical conditions to evaluate. If we use excel 2019, it might be much simpler for us to do that if we use the IFS function.
Want to know more about IFS and how to use it properly in excel? Read this tutorial until its last part!
Disclaimer: This post may contain affiliate links from which we earn commission from qualifying purchases/actions at no additional cost for you. Learn more
Want to work faster and easier in Excel? Install and use Excel add-ins! Read this article to know the best Excel add-ins to use according to us!
Table of Contents:
- What is the IFS function in excel?
- IFS usability
- IFS result
- Excel version from which we can start using IFS
- The way to write it and its inputs
- Example of its usage and result
- Writing steps
- IFS with a default value (If all logic condition inputs are false)
- IFS vs IF bertingkat
- IFS vs SWITCH
- Exercise
- Additional note
What is the IFS Function in Excel?
IFS is an excel function that helps you to evaluate logic conditions in phases and get a result based on that.IFS Usability
You can use IFS to get a particular result based on the logic conditions evaluation process in phases that you perform.IFS Result
The IFS result depends on which logic condition you evaluate in it is true.Excel Version from Which We Can Start Using IFS
We can start using IFS in excel in excel 2019.The Way to Write It and Its Inputs
Here is the way to write the IFS formula in excel.
= IFS ( logic_condition1 , result_if_true1 , … )
When using IFS, you need to input the logic condition you want to evaluate with its true result in pairs.
IFS will first evaluate the logic condition you input earlier. It will only evaluate the next logic condition if the previous logic condition is false.
You can input up to 127 logic conditions with their true result to IFS.
Example of Its Usage and Result
Here is the implementation example of IFS in excel.
As you can see here, we can evaluate multiple logic conditions in phases and get the result we want with IFS. Just input all your logic conditions and their true result in pairs and phases when using this formula.
Different than a normal IF, we cannot specify a false result in IFS if all our logic conditions are false. You will get a #N/A error if that happens. To prevent that from happening, you can use the method that we will discuss in the next part of this tutorial.
Writing Steps
Need guidance when you write your IFS formula in excel? Take a look at the IFS writing steps we have created for you below!-
Type an equal sign ( = ) in the cell where you want to get your IFS result

-
Type IFS (can be with large letters and small letters) and an open bracket sign after =

-
Input the logic condition you want to evaluate first. Then, type a comma sign ( , )

-
Input the result you want from IFS if the logic condition you inputted previously is true

-
Type a comma sign and repeat steps 3-4 until you have inputted all your logic conditions and their true results

-
Type a close bracket sign

- Press Enter
-
Done!

IFS with a Default Value (If All Logic Condition Inputs are False)
Need a result from IFS if all the logic conditions you input into it are false?In this situation, you should input TRUE as the last logic condition input of your IFS. This will ensure you catch all the conditions if the logic conditions you input previously are all false. After you input that TRUE, you just need to input the result you want if all your logic conditions are false.
Here is the general writing form of the IFS with the TRUE as its last logic condition input.
= IFS ( logic_condition1 , result_if_true1 , … , TRUE , result_if_all_false )
Simple, isn’t it? And here is an implementation example of this concept in excel.

As you see in the example’s second row, when there is no true logic condition, IFS will produce our TRUE result.
IFS vs Nested IFs
If you use the excel version before excel 2019, you may use nested IFs to mirror the function of IFS. Nested IFs are when we write multiple IFs one after another to evaluate multiple logic conditions in phases.Here is the general writing form of nested IFs in excel.
= IF ( logic_condition1 , result_if_true1 , IF ( logic_condition2 , result_if_true2 , … , result_if_all_false ) )
Now, what is the difference between nested IFs and IFS?
Well, first of all, the writing of IFS seems to be cleaner and easier to understand than nested IFs. This is because IFS’s primary function is really to evaluate multiple logic conditions in phases. Nested IFs is something we create prior to excel 2019 mostly because there isn’t a function like IFS.
Second, you can only nest up to 64 IFs in nested IFs. That means you can “only” evaluate up to 64 logic conditions with nested IFs. On the other hand, you can input up to 127 logic conditions to IFS.
Thus, should the circumstances allow, we suggest you use IFS instead of nested IFs!
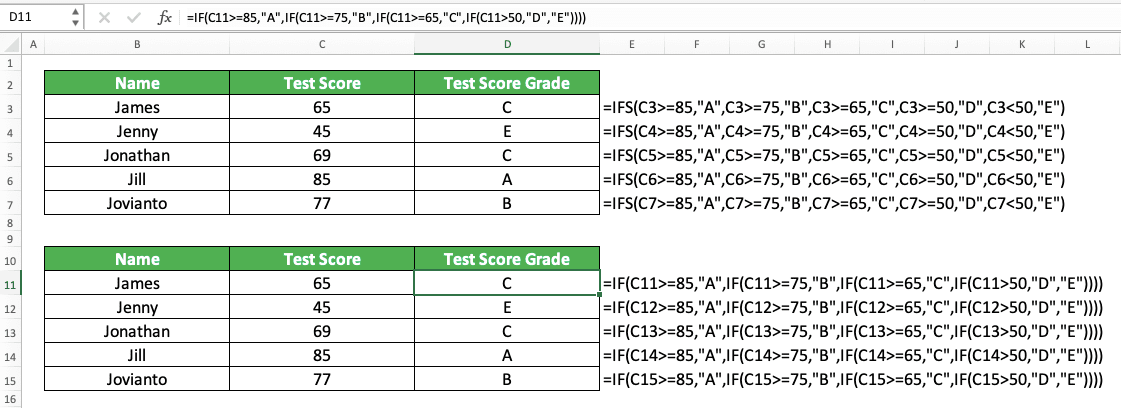
To understand their comparison better, here is an implementation example of both formulas in excel.

As you can see, the writing of the nested IFs formula seems a bit more complicated than IFS. That is because we have IFs on top of each other in nested IFs. Meanwhile, IFS is cleaner as we just need to input our logic condition and its true result pairs sequentially.
The two formula writings should produce the same result if you write them correctly. Thus, you can use whichever you prefer between these two methods.
IFS vs SWITCH
Another function that is quite similar in terms of its usability to IFS is SWITCH. As with IFS, you can use SWITCH since excel 2019.Here is the general writing form of SWITCH in excel.
= SWITCH ( data , value_to_match_with_data1 , result1 , … , [ result_if_no_match ] )
SWITCH works by comparing multiple values in phases to the cell content or formula result we input into it. We input the multiple values in phases with the result we want from them. If the value matches our cell content or formula result, SWITCH will produce its corresponding result.
Seems quite similar to IFS, isn’t it? However, there is a plus and minus when you use IFS or SWITCH over each other.
If you use SWITCH, then you only need to input the cell content or formula result you want to compare once. This will make your formula writing cleaner and it should be easier to understand rather than when you use IFS.
On the other hand, SWITCH can only compare the cell content or formula result through “match” or “not match”. If what you want to compare is a number, you cannot use operators like “>” (larger than) or “<“ (smaller than) in SWITCH.
IFS is more flexible in that regard and, thus, gives you wider options for the logic conditions you want to evaluate.
Each of them has its own advantage. Thus, you should choose SWITCH or IFS according to the circumstances in your data processing process!
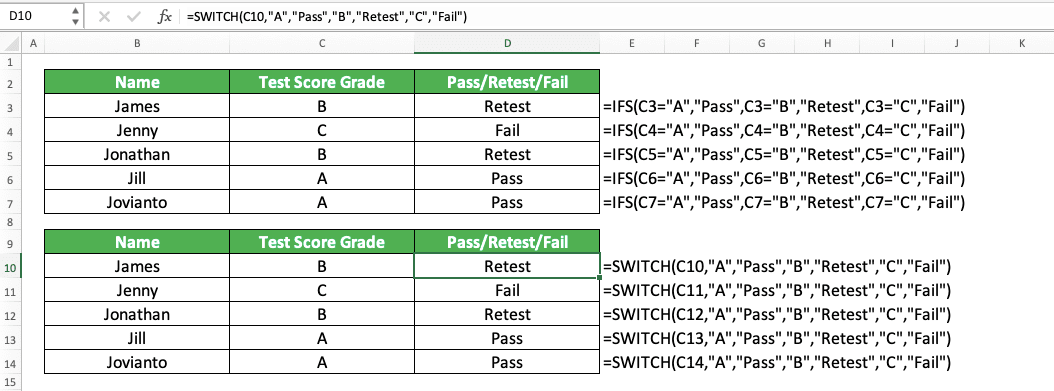
To understand the comparison better, here is an implementation example of SWITCH and IFS over the same data set in excel.

As you can see, SWITCH can produce the same result as IFS if we have the right data set. It is also simpler in its writing since we don’t have to repeat our cell coordinate input.
However, if we have the data set where we should evaluate anything other than matches, we should use IFS (or nested IFs). That is because SWITCH can only evaluate matches to produce its result.
Exercise
After you have learned how to use IFS in excel properly, let’s do an exercise! This is so you can understand the tutorial lessons more practically.Download the exercise file and answer the questions below. Download the answer key file if you have done the exercise and want to check your answers.
Link to the exercise file:
Download here
Questions
Give your answer by using IFS in the appropriate gray-colored cell according to the question number!- The inventory quantity is “Excessive” if >1500, “OK” if 1000-1500 (excluding 1000), and “Not Enough” if <=1000. What is the assessment result of the inventory quantity for each branch?
- Sales is “Excellent” if >9000, “Good” if 8000-9000 (excluding 8000), “OK” if 7000-8000 (excluding 7000), “Bad” if 6000-7000 (excluding 6000), and “Unfavorable” if <=6000. What is the assessment result of the sales quantity for each branch?
- The number of product variations is “Good” if >20, “OK” if 10-20, and “Need More” if <=10. What is the assessment result of the number of product variations for each branch? Use TRUE in your IFS for this!
Link to the answer key file:
Download here
Additional Note
Be careful when determining the logic condition you should input first in IFS. Wrong order can make you get a wrong result!Related tutorials you should learn too:


