How to Print in Excel Neatly


In this tutorial, you will learn how to print in excel the right way.
When working with an excel document, we sometimes need to print so we can get the document’s hardcopy version. We might need to show it to our colleagues so they can discuss the content with us.
Excel has some features related to printing that you should master so you can print your excel document neatly. Want to understand how to utilize those printing features in excel optimally? Need to get your excel document hardcopy in the way you prefer but you don’t know how to do it? Read all parts of this tutorial!
Disclaimer: This post may contain affiliate links from which we earn commission from qualifying purchases/actions at no additional cost for you. Learn more
Want to work faster and easier in Excel? Install and use Excel add-ins! Read this article to know the best Excel add-ins to use according to us!
Table of Contents:
- How to print in excel: step-by-step
- How to manage excel print settings
- How to set print area in excel
- How to set pages to print in excel
- How to insert page breaks in excel
- How to print in excel so there won’t be any cut
- How to print in excel so the font won’t be small
- How to print in excel on one page (fit to one-page settings)
- How to print selection in excel
- How to print selected worksheets in excel
- How to print the same cell range from multiple sheets
- How to print the entire workbook/all sheets in excel
- How to print to file
- How to print with title in excel
- How to print in excel with lines/gridlines
- How to print formulas in excel
- How to print charts in excel
- How to print comments in excel
- How to add a print command button in excel
- Exercise
- Additional note
How to Print in Excel: Step-by-Step
To start, let’s discuss the steps to print an excel document first. These steps are quite straightforward so you should be able to follow them easily.-
In the excel file that you want to print, click File and choose Print. Alternatively, you can also just press Ctrl + P (Command + P on Mac)

-
Manage the print settings according to the printing process and result you prefer. You can see more discussion about the print settings in excel in the next parts of this tutorial

-
If the settings already look good, click Print

- Done! Your printer should begin to process the hardcopy version of your excel document now
How to Manage Excel Print Settings
You may get confused with all the print settings you can manage in the excel print menu. What do they mean and how do they affect your printing process and result? Here is a bit explanation about them so you can manage your print settings correctly according to the way you prefer.
Copies: How many copies of hardcopy you want to print from your excel document.

Printer: From which printer you want to print your excel document.

Scope:
- Print Active Sheets: Print only the worksheet you currently activate
- Print Entire Workbook: Print all the worksheets in your current excel workbook
- Print Selection: Print only the cells you currently highlight

Pages … to ….: From which page to which page you want to print your worksheet. You can manage your worksheet’s pages in the page break preview menu.
If you don’t do anything on this setting, then excel will print all the contents in your current printing scope.

Paper Sides:
- Print One-Sided: Print only on one side of your papers
- Print on Both Sides (Flip Pages on Long Edge): Print on both sides of your papers. Excel will assume people will turn pages in your document from left to right and print your document accordingly
- Print on Both Sides (Flip Pages on Short Edge): Print on both sides of your papers. Excel will assume people will turn pages in your document from top to bottom and print your document accordingly

Collated/not:
- Collated: If you print multiple copies of your document, then excel will print them per copy (e.g. will begin by printing copy 1, and then copy 2, and so on)
- Uncollated: If you print multiple copies of your document, then excel will print them per page (e.g. will begin by printing all page 1 of the copies, then all page 2 of the copies, and so on)

Using staples/not: If your printer can staple, then tell excel which side you want to place staples in your pages. If your printer can’t staple or you don’t want to staple your papers, choose “No Staples”.

Orientation:
- Portrait Orientation: Print your document to your papers in a portrait orientation
- Landscape Orientation: Print your document to your papers in a landscape orientation

Paper size: Determine the size of the papers you will print your document into. Excel will fit the document according to the paper size you choose.

Margin: Determine the distance between the edge of your paper and the edge of content in the excel document you print.

Scaling:
- No Scaling: Print according to the actual size of all the contents in your excel document
- Fit Sheet on One Page: Print all the contents in your excel document into one page
- Fit All Columns in One Page: Print all the content columns in your excel document into one page
- Fit All Rows in One Page: Print all the content rows in your excel document into one page
- Custom Scaling Options…: Customize the scaling of the contents in your excel document for the printing purpose
Choose the correct settings according to the printing result you want from your excel document!
How to Set Print Area in Excel
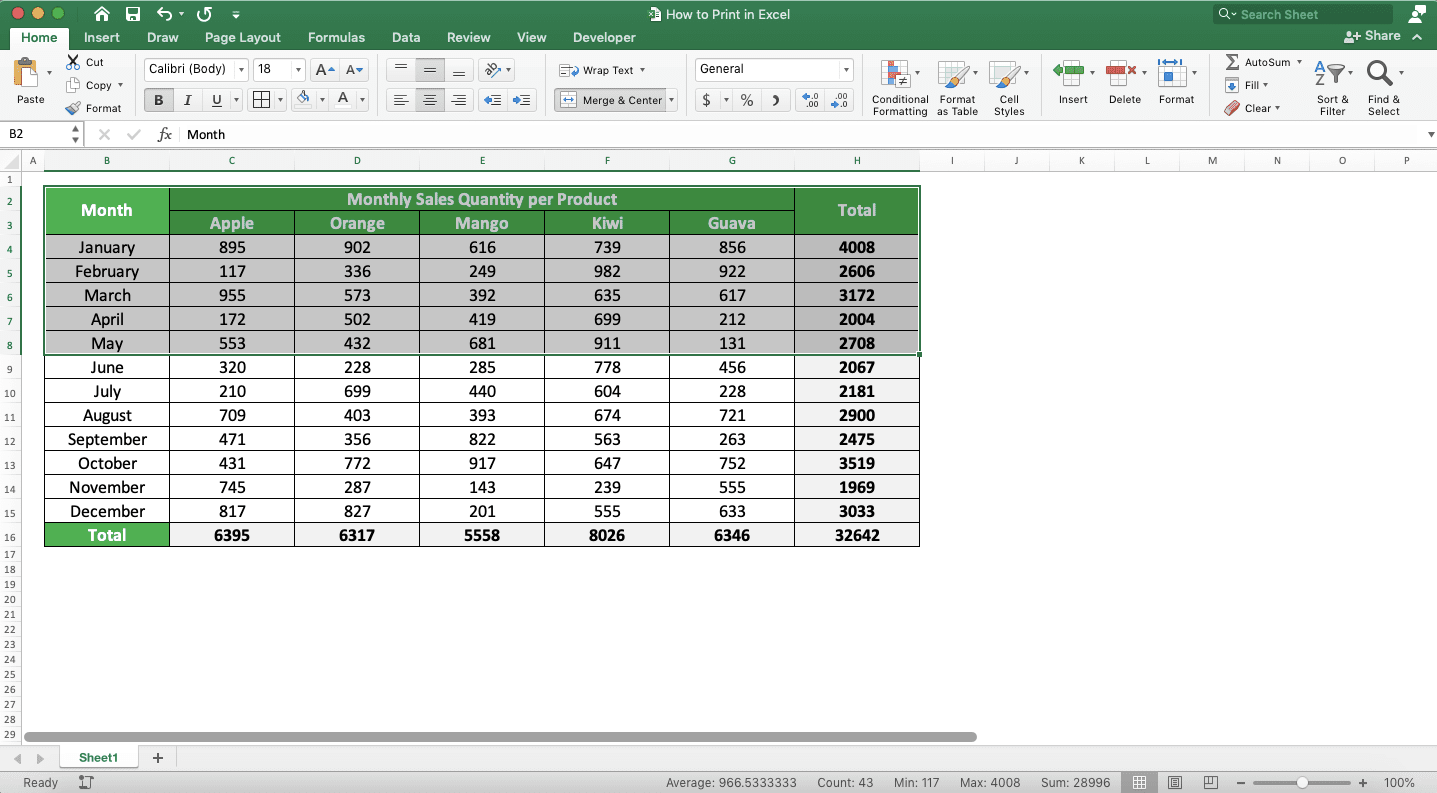
The print area is the part that excel will print for you when you print your worksheet. By default, Excel will print all the part of your worksheet that has data in it.However, if you want to determine the print area yourself, then you can follow these steps.
-
Highlight the cell range in your worksheet that you want to set as the print area
-
Go to the Page Layout tab, click the Print Area button, and choose Set Print Area
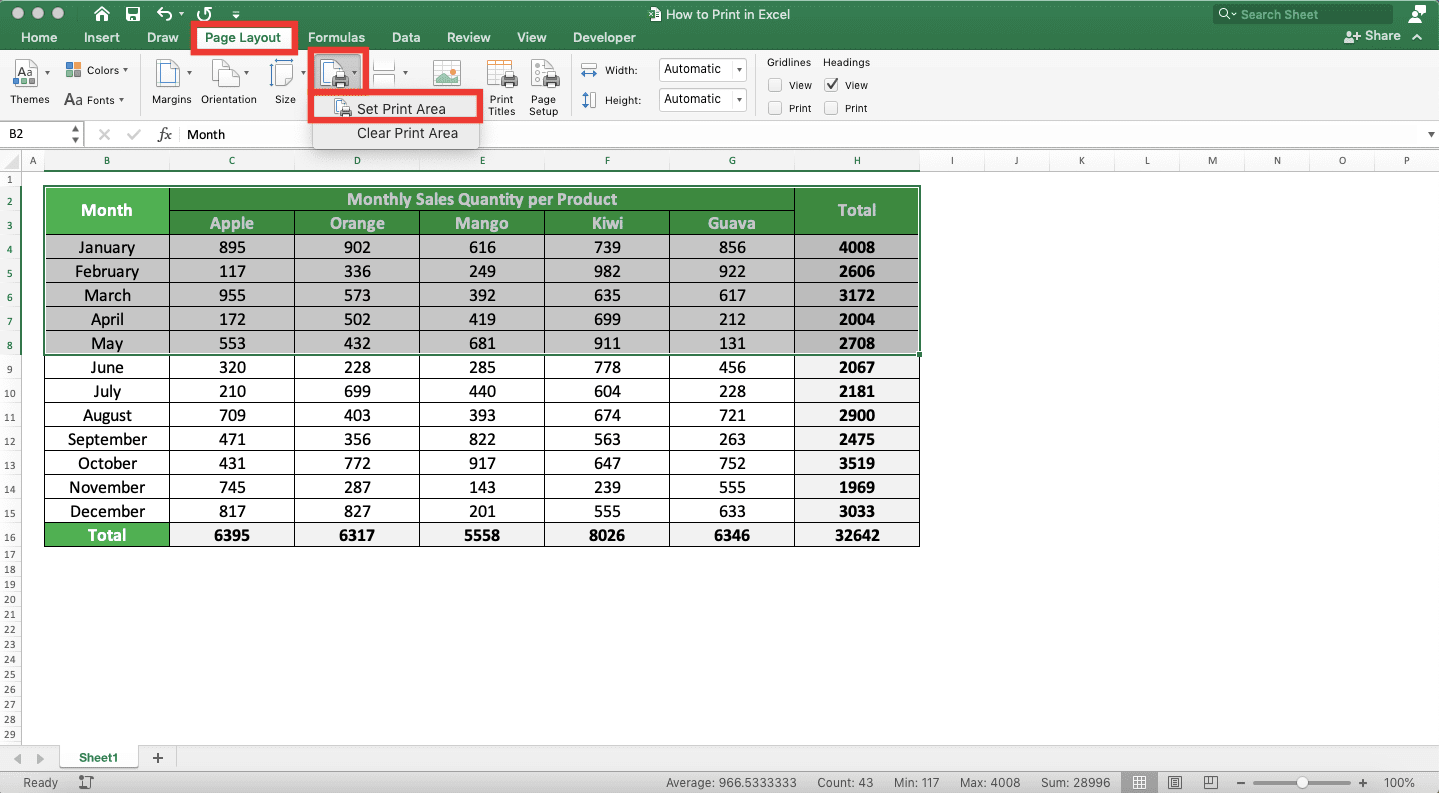
- Done! You have set the cell range you highlight as your worksheet’s print area
If you want to go back to the default print area, then click the Print Area button again. Then, choose Clear Print Area.

How to Set Pages to Print in Excel
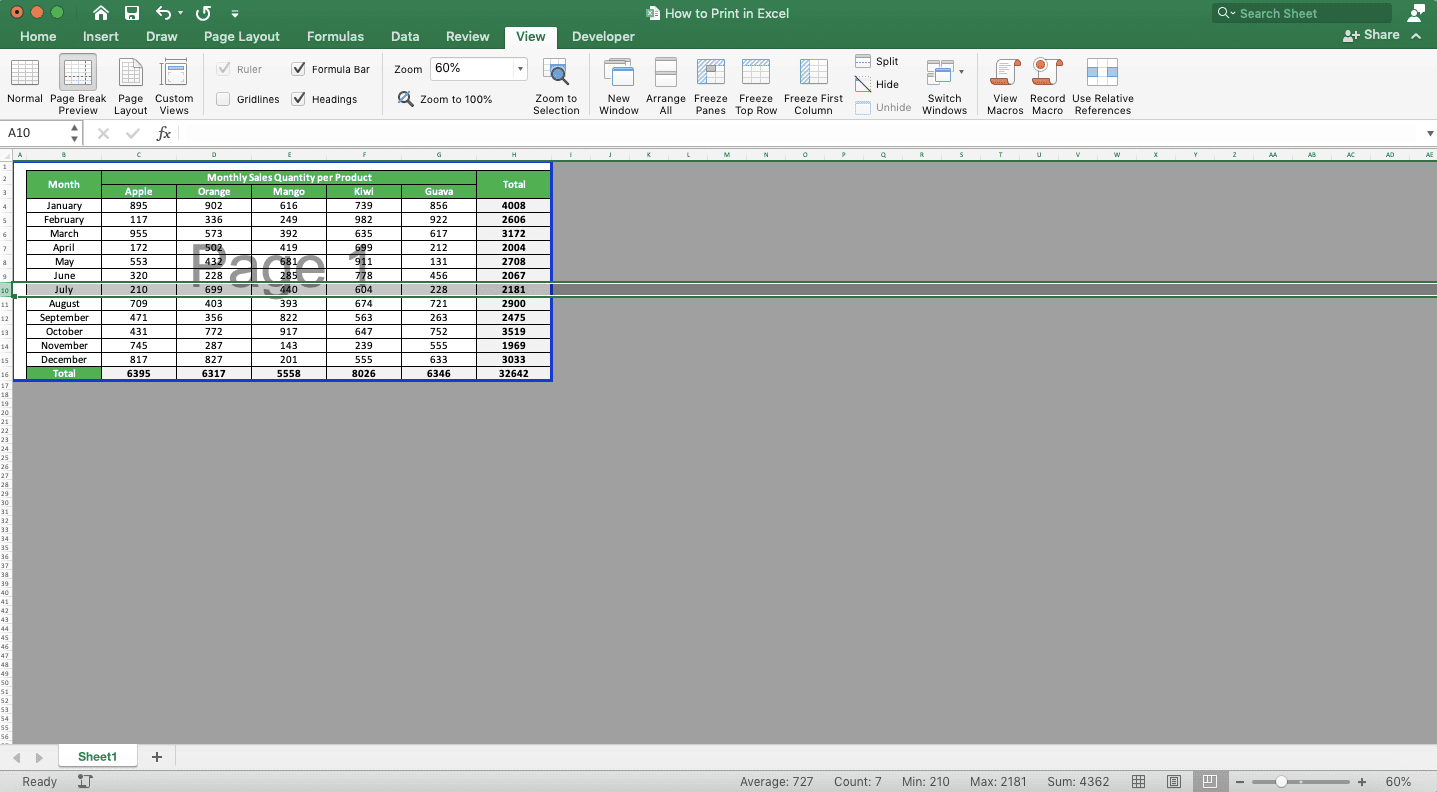
Want to manage the pages division for your printing process in excel? You can do that in the page break preview interface in excel.To activate that interface, go to the View tab and click the Page Break Preview button on the left. You will activate the interface from where you can set the pages in your worksheet.

In the interface, you will see blue horizontal and vertical dashed lines as the boundaries between your pages.

Just move your pointer to the relevant lines and drag them to set your worksheet’s pages to the way you prefer.
Want to go back to the normal worksheet interface? Just go to the View tab again and click the Normal button there.

How to Insert Page Breaks in Excel
Need to insert a page break in your worksheet? Follow these easy steps to do it.-
Go to the View tab and click the Page Break Preview button. You can insert page breaks without going to the page break preview interface. However, you better go there while setting your page breaks so you can see the result clearly

-
Highlight the column/row where you want to insert your page break
-
Go to the Page Layout tab, click the Breaks button there, and choose Insert Page Break

-
Done! You have inserted a page break to the worksheet part you highlight.

If you need to insert other page breaks, repeat steps 2-3 until you have inserted all of them
How to Print in Excel so There Won’t Be Any Cut
To print your content without a page cut, you need to check your scaling setting when you print. From the available settings, choose:- Fit Sheet on One Page, if you don’t want excel to cut the rows and columns in the content you print
- Fit All Columns on One Page, if you don’t want excel to cut the columns in the content you print
- Fit All Rows on One Page, if you don’t want excel to cut the rows in the content you print

Choose the scaling content that fits into your needs so there won’t be any unnecessary cut to your content.
How to Print in Excel so the Font Won’t Be Small
You can check the actual font size you will get in the print preview next to your print settings. If it is too small (or too big), then you need to adjust the scaling setting of your printing. Logically, the more content you fit into your page, the smaller font size you will get.If you want to manually adjust your scaling so your font can be bigger, then choose the Custom Scaling Options option.

In the dialog box that shows up, change the number in the “Adjust to” text box.
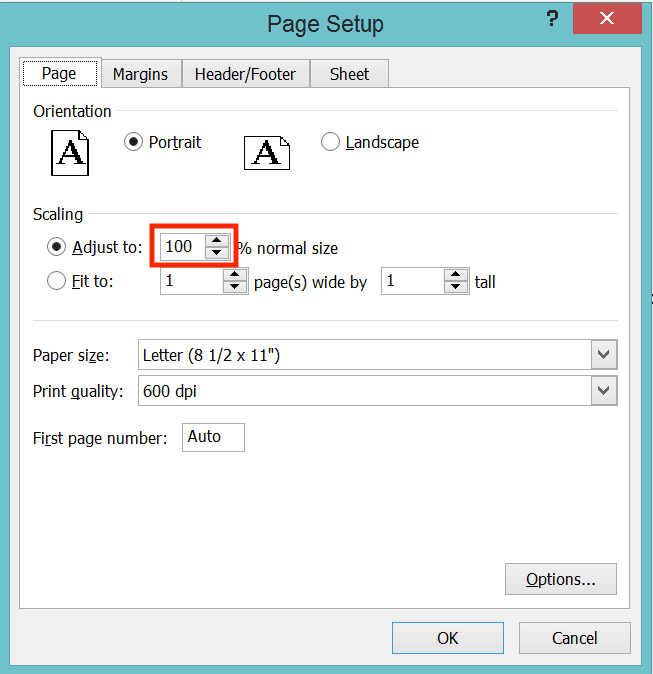
Change it until you get the font size you want. To check the font size you get from your current scaling adjustment, take a look at the print preview again.
How to Print in Excel on One Page (Fit to One-Page Settings)
To fit all content you want to print into one page, choose Fit Sheet on One Page in your scaling setting.
However, be careful as the more content you fit into one page, the smaller they will get on your page!
How to Print Selection in Excel
To print only a selected part of your worksheet in excel, highlight the cell range which contains the part first. Then, go to your print settings page and choose the Print Selection scope setting.
Click the Print button after that and you will only print the content in the cell range you highlight!
How to Print Selected Worksheets in Excel
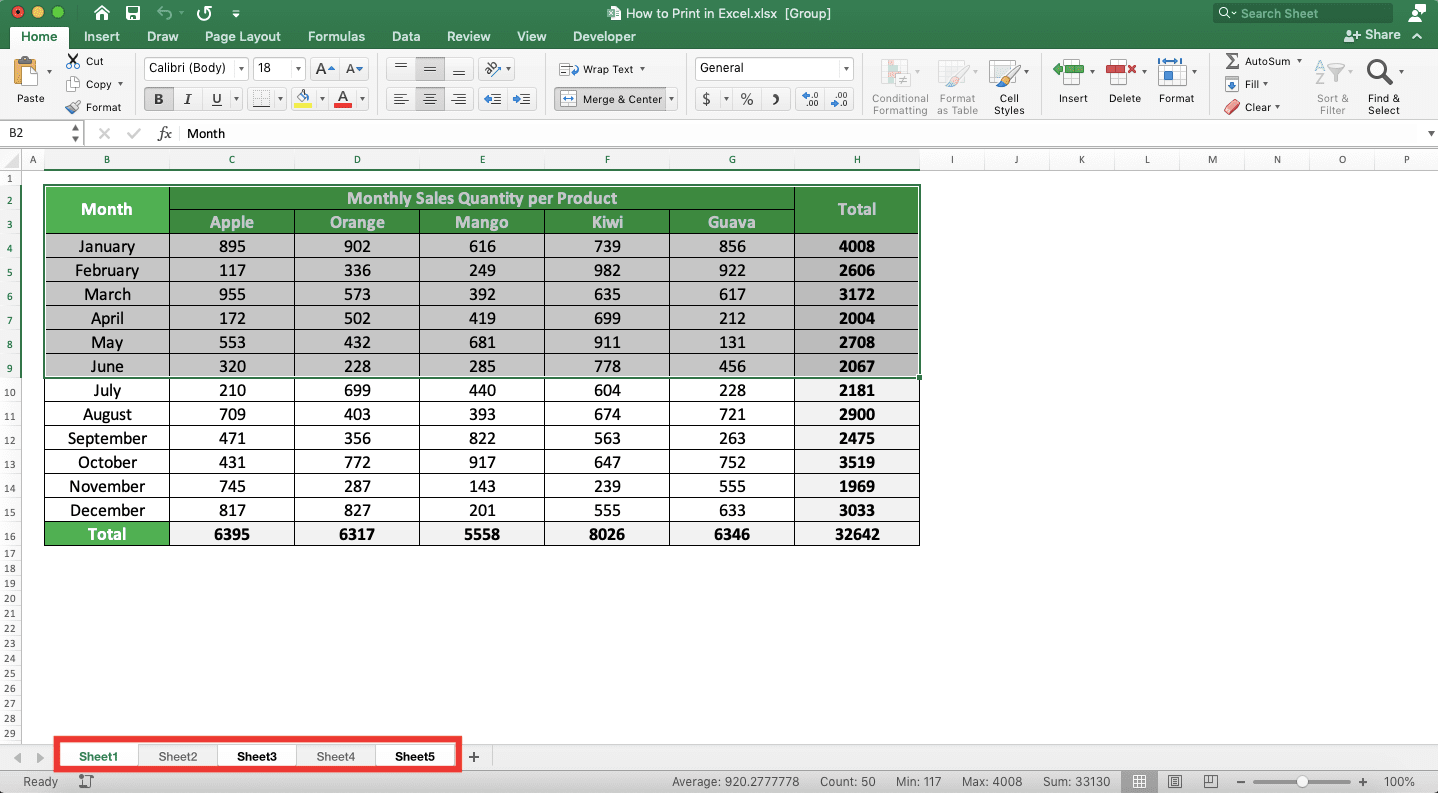
To print several of your worksheets, select the worksheet tabs you want to print first. You can find the worksheet tabs on the bottom left of your workbook.
You can select multiple adjacent worksheet tabs by clicking the tab on the most left/right of the adjacent tabs first. Then, hold the Shift button while clicking the worksheet tab on the opposite end of the adjacent tabs. The result will be something like this (see the red box).

If you want to select non-adjacent worksheet tabs, then hold the Ctrl button (command button in Mac) while clicking on those worksheet tabs. The result will be something like this (see the red boxes).

After selecting the worksheets you want to print, go to the print settings page. Set the settings according to your preference and click the Print button. Excel should print the worksheets you selected after that!
How to Print the Same Cell Range from Multiple Sheets
Need to print the same cell range from multiple worksheets? You can combine the previous methods to print a selected cell range and worksheets to do this. Here are the steps.-
Highlight the cell range you want to print from the multiple worksheets in your current worksheet

-
Select the tabs of the worksheets you want to print by using the Shift or Ctrl button. Refer to our previous discussion if you don’t know how to do that
-
Go to the print settings page by clicking File and choose Print or by pressing Ctrl + P (Command + P in Mac). Choose the Print Selection scope setting there. Set the other print settings in the way that you prefer

- Click the Print button after you have done your print settings. You will print the same cell range from all the worksheets which tabs you selected!
How to Print the Entire Workbook/All Sheets in Excel
To print all the worksheets in your excel workbook, you can just select Print Entire Workbook in your print scope setting.
Click the Print button after that and you will begin to print all the worksheets in your workbook!
How to Print to File
Want to save your current printing content and settings so it is ready to print later? You can print them to file first and place the file to somewhere you can access later.Here are the steps to do that.
-
In the excel file you want to create the printing file from, click File and then Print or press Ctrl + P (Command + P in Mac)

-
In the printer setting in your print settings page, choose Print to File

-
Click the Print button

-
In the Save Print Output As dialog box, browse to the folder where you want to save your file. Type your file name in the text box and then click Save

- Wait until excel successfully creates your file. Your printing file is now available at the folder you save it to
How to Print with Title in Excel
Need to make several rows’ contents as the title for every page that you print from an excel worksheet? Here are the steps to set that title.-
Go to the Page Layout tab and click the Print Titles button there

-
In the dialog box that shows up, make sure you are in the Sheet tab. Then, click the button in the “Rows to repeat at top” text box on the tab page

-
Drag across the rows you want to set as the title when you print later. Excel will automatically input the row coordinates you drag into the text box. Click the button in the text box after you finish inputting the rows

-
You can also set the columns to repeat on every page in the “Columns to repeat at left” text box. Click the OK button after you have finished setting the title

- Done! Now, whenever you print the worksheet, the rows you set earlier should become the title on your every page
How to Print in Excel with Lines/Gridlines
By default, Excel doesn’t print its gridlines to your pages whenever you print your worksheet. If you need to print them, however, then you can activate its print setting.Do that by going to the Page Layout tab in your excel workbook first. Then, click on the Gridlines Print checkbox there to give a checkmark.

Now, whenever you print the worksheet, Excel will print its gridlines too! If you don’t want to print them anymore, just click on the Gridlines Print checkbox again to remove the check mark.
How to Print Formulas in Excel
Need to print the formulas in your worksheet cells instead of their results? You can do that easily by showing those formulas before you print.To show them, just press Ctrl + ` when you are in the worksheet from which you want to print your formulas. You can also go to the Formulas tab and click on the Show Formulas button there.
Before showing the formulas

After showing the formulas

To hide the formulas again, just press Ctrl + ` or click on the Show Formulas button again.
How to Print Charts in Excel
If you have excel 2013 onwards, then you can print only a chart and not anything else from your worksheet. To do that, just select the chart you want to print first by clicking on it.Then, go to the print settings page by clicking the File and the Print button or press Ctrl + P (Command + P in Mac). In the scope setting there, choose Print Selected Chart.
After that, click the Print button. Your printer will then begin to print the chart you selected!
How to Print Comments in Excel
Want to print the comments you have in your worksheet? You may need to read them in a hardcopy form so you can work on them better.By default, Excel doesn’t print the comments you have in your worksheet cells. However, you can change that by managing its settings in your Page Setup menu.
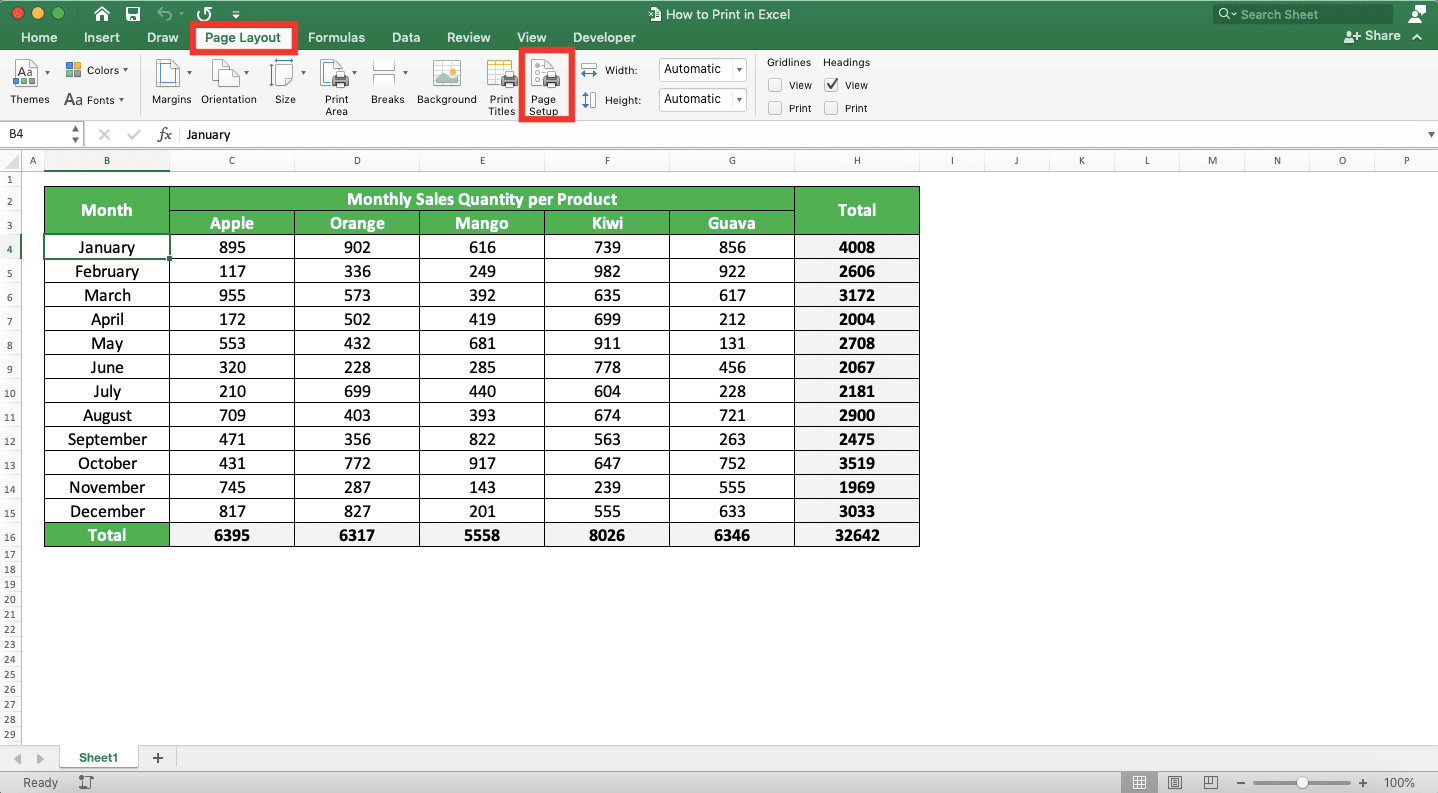
To access that menu, go to the Page Layout tab and click the Page Setup button there. You can also access it from your print settings page by clicking on the Page Setup button available there.
Excel Page Setup button in the Page Layout tab
Excel Page Setup button in the print settings page

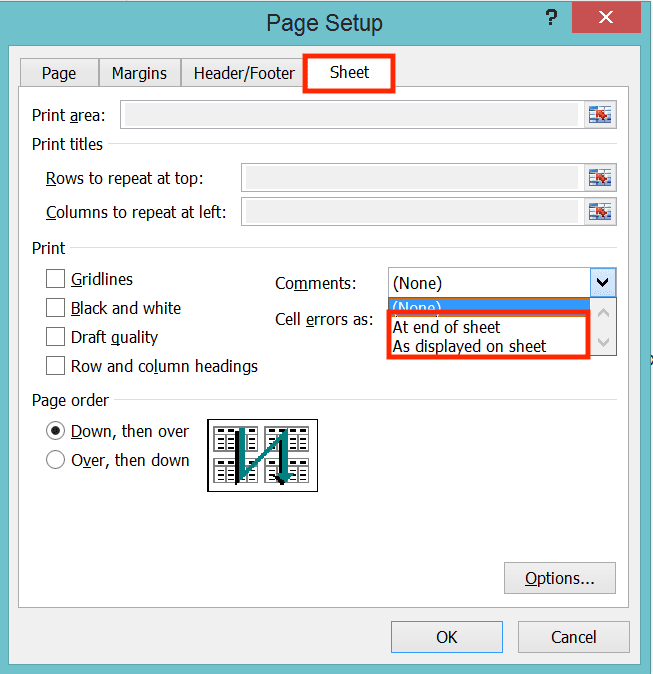
In the dialog box that shows up after you click the Page Setup button, go to the Sheet tab. On the tab page, you will see a dropdown with the Comments label.
Click on the dropdown and choose either “At end of sheet” or “As displayed on sheet”. Choose “At end of sheet” if you want to print the comments on a separate page from your worksheet contents. You will get the comments’ cell coordinate and the person name who writes it on that separate page.
To print the comments as they are, choose “As displayed on sheet”.
After you set the Comments dropdown, click OK. Now, when you print the worksheet, you will print its comments too!
How to Add a Print Command Button in Excel
If you need a button to access the printing function faster, you can add it to your quick access toolbar. Just click the quick access toolbar dropdown and check “Print” there by clicking on it if it is currently unchecked.
Doing that will add the “Print” command button in your quick access toolbar! Now, you can just click on it whenever you need to print your excel document.

Exercise
After you have learned how to print in excel in various ways, now is the time to do an exercise. You should do this exercise so your understanding of what you have learned will be better.Download the exercise file below or open an excel file where you have data to be printed.
Link to the exercise file:
Download here
Now, try to print the excel file with your printer. Try to make excel not cut its columns, rows, and try to print it in a one-page version too. You can try to make other variations of printing results if you want.
What is the print result? Can you do it?
Additional Note
If you need to print multiple copies of your excel document, then it is often better to print one copy first. See if you have already got the printing result you want from your current print settings.If yes, then you can begin to print multiple copies. If not, then you can go back to your print settings to fix the wrong things in it!
Related tutorials you should learn: