How to Use the MID Function in Excel: Usabilities, Examples, and Its Writing Steps
Home >> Excel Tutorials from Compute Expert >> Excel Formulas List >> How to Use the MID Function in Excel: Usabilities, Examples, and Its Writing Steps


In this tutorial, you will learn how to use the MID function in excel completely.
When working in excel, we may sometimes need to get part of our data in a separate place. If we know how to use the MID function in excel, then we can do the data separation process easily.
Want to know more about MID and how to use it properly and optimally in excel? Read this tutorial until its last part!
Disclaimer: This post may contain affiliate links from which we earn commission from qualifying purchases/actions at no additional cost for you. Learn more
Want to work faster and easier in Excel? Install and use Excel add-ins! Read this article to know the best Excel add-ins to use according to us!
Table of Contents:
- What is the MID function in excel?
- MID usabilities
- MID result
- Excel version from which we can start using MID
- The way to write it and its inputs
- Example of its usage and result
- Writing steps
- Why we cannot use MID on dates/times?
- Remove redundant spaces before we use MID: MID TRIM
- Get our data characters from a position of a character: MID FIND/SEARCH
- Get our data characters until the last character: MID LEN
- Get first, middle, and last names from a full name: MID SEARCH LEN
- Get nth word from a text: TRIM MID SUBSTITUTE REPT LEN
- Get a word that contains specific characters: TRIM MID SUBSTITUTE REPT LEN MAX FIND
- Get a number from MID: VALUE MID
- Exercise
- Additional note
What is the MID Function in Excel?
MID function in excel is a function that helps us to get the part of our data that we need. We get the part by separating it from the data that we have.MID Usabilities
You can use MID to separate the part of data that you need for your further data processing processes or results.MID Result
The MID result is the data part you separate from another data.Excel Version from Which We Can Start Using MID
We can start using MID since excel 2003.The Way to Write It and Its Inputs
Here is the general writing form of MID in excel.
= MID ( data , separation_starting_position , number_of_characters_to_separate )
And here is a bit explanation of the inputs we need to give to MID.
- data = the data which part we want to separate to get the result we need
- separation_starting_position = the starting position in the data from where we want to separate its part (we count the order of the position from the most left position of the data)
- number_of_characters_to_separate = the number of characters that we want to separate from the data from the starting position
Example of Its Usage and Result
Here is a usage and result example of MID in excel.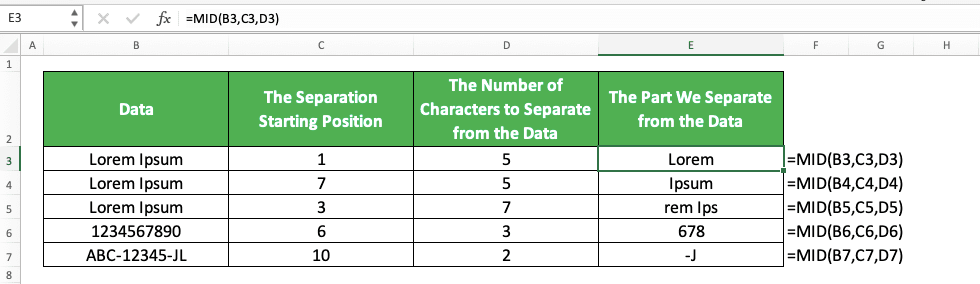
In this example, you can see how we separate a part of our data with MID. We input the data, the separation starting position, and the number of characters we want to separate to MID.
We count the starting position from the most left position of our data, starting with 1 for that position. We need to consider things like spaces or other delimiters too when we input our starting position and number of characters.
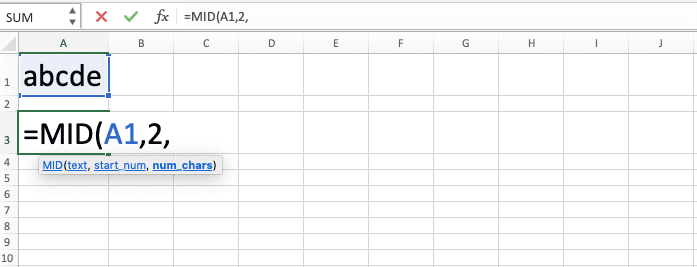
Writing Steps
After understanding about the MID writing form, inputs, and its implementation example, now let’s learn about its writing steps. If you have understood our discussion earlier, you will have a much easier time when you learn these steps!-
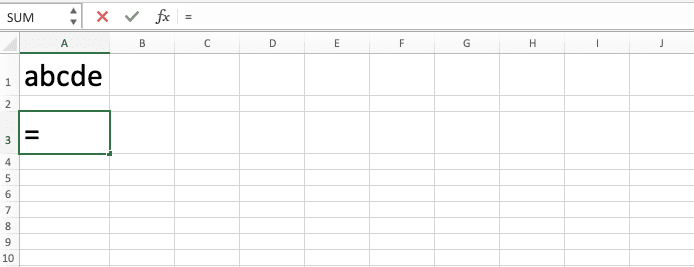
Type an equal sign ( = ) in the cell where you want to put the data part that you separate by using MID
-
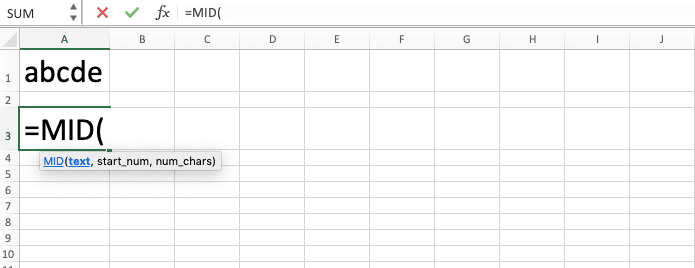
Type MID (can be with large and small letters) and an open bracket sign after =
-
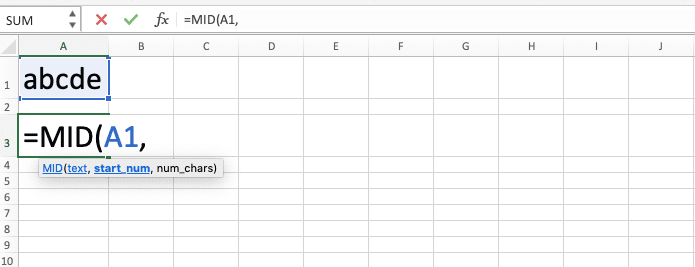
Input the data you want to separate the part of with MID. Then, type a comma sign ( , )
-
Input the number which represents the starting position in the data where you want start separating its part. We start counting the starting position from the most left character of the data. After you input the number, type a comma sign
-
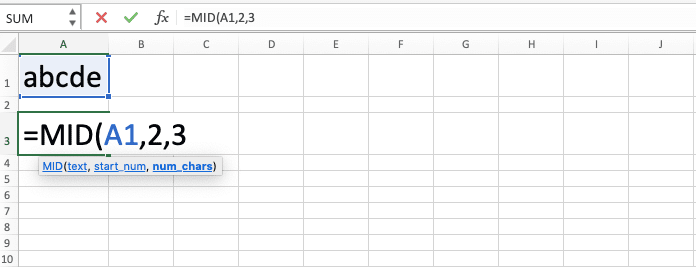
Input the number of characters you want to separate from the data
-
Type a close bracket sign
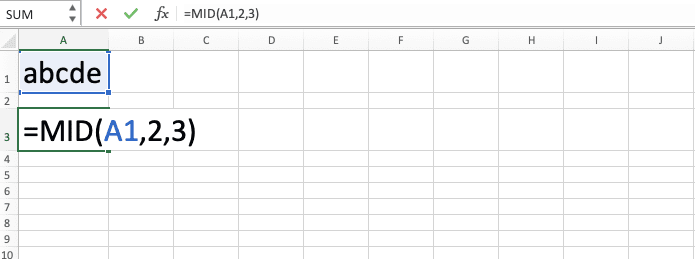
- Press Enter
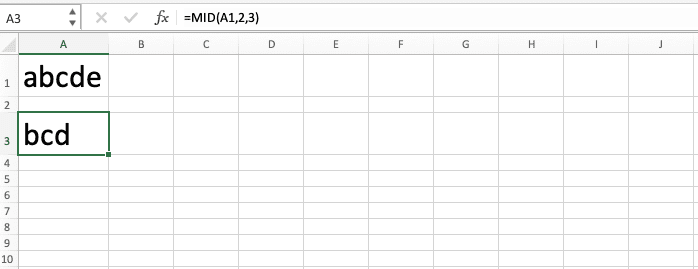
-
Done!
Why We Cannot Use MID on Dates/Times?
Ever apply MID on date/time data and you get a wrong/error result like this?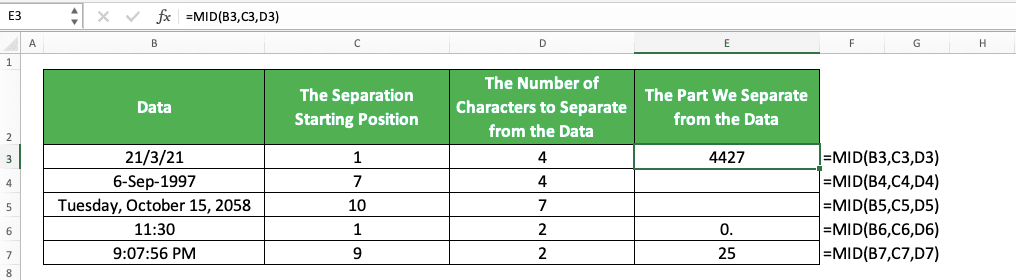
Instead of getting the part of date/time that we want, we get a seemingly random number or even a blank.
Why does that happen?
Well, date/time data in excel is actually just a standard number which excel displays in a different format. Thus, when you use MID on it, excel separates the part of its true value (not the way the number displays itself), which is that standard number. That is why you get that weird number or a blank when you apply MID on your date/time!
Here is another look at the previous example when we convert our date/time there to their number form. You can do this on your date/time too by changing its format to a number in the format cells menu.
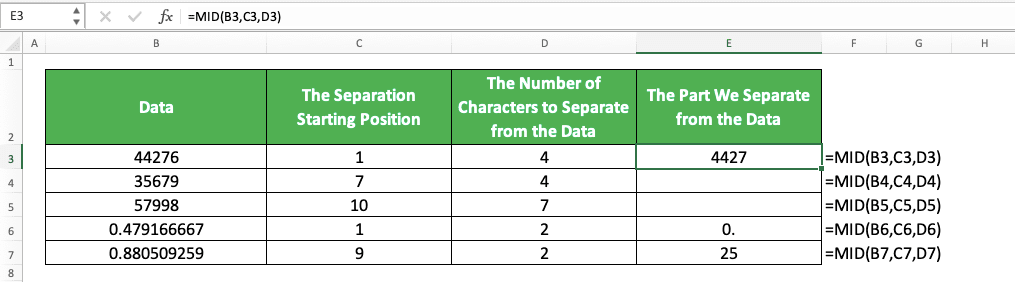
The MID results make much more sense now, right? It turns out that we seem to cannot get our date/time data part if it comes from a number.
So, what should we do if we need our date/time data part in our excel work? A solution you can try is by making your date/time a text first.
To do that, you need to retype your date/time. Add a single quote ( ‘ ) before your date/time if Excel automatically converts it to its standard date/time display.
Here is what happens when we do that to the date/time we want to apply MID to previously.

Now, that is a proper date/time separation result!
Remove Redundant Spaces Before We Use MID: MID TRIM
Sometimes, our data isn’t clean, especially if we import it from external sources. There can be redundant spaces that can prevent us from processing those data properly in excel.This can be a problem if we need to apply MID to those data with redundant spaces. We can get a wrong result because our MID inputs don’t consider/pay attention to those redundant spaces.
One solution we can implement for this is to apply TRIM to the data before we apply MID to our data. TRIM is an excel formula you can use to remove redundant spaces from your data.
Here is the general writing form of the MID and TRIM combination in excel.
= MID ( TRIM ( data ) ) , separation_starting_position , number_of_characters_to_separate )
We write TRIM inside our MID in the data input part. We apply TRIM to the data we intend to separate the part of first so we can remove its redundant spaces. Only after that, we will separate the data part using MID.
Here is the implementation example of the MID and TRIM formulas combination in excel.
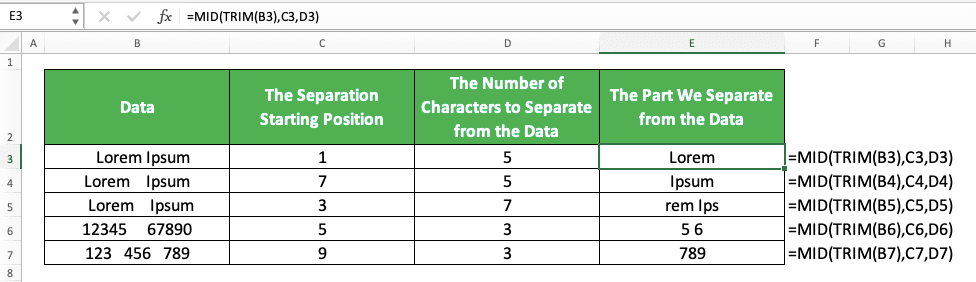
Don’t see any difference? Here are the results if we don’t use TRIM before MID to the data.
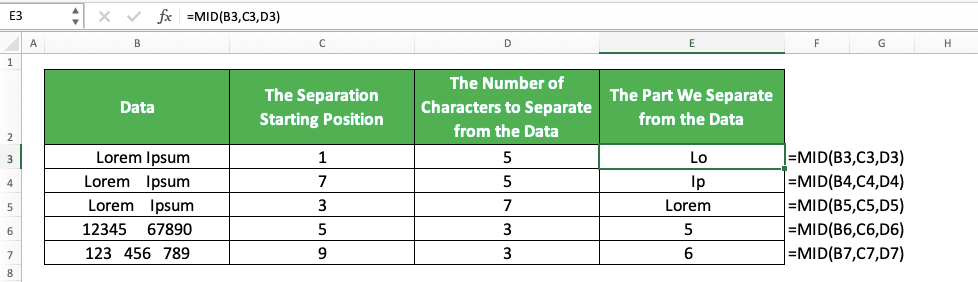
Different results, right? That is because of the redundant spaces that our data has. If we don’t apply TRIM, then MID will still count the redundant spaces when processing its result.
Thus, if we need to be careful with redundant spaces when using MID in excel, apply TRIM to our data first.
Get Our Data Characters from a Position of a Character: MID FIND/SEARCH
Need to determine the starting position input of your MID from the position of a character in your data? If that is the condition, then you can use FIND/SEARCH in that part of your MID input.FIND and SEARCH are formulas in excel you can use to find the position of a character(s) in your data. The difference between them is FIND is case-sensitive and doesn’t support wildcard characters. On the other hand, SEARCH isn’t case-sensitive and supports wildcard characters in its input.
Here is the general writing form of the MID and FIND/SEARCH combination for our purpose.
= MID ( data , FIND/SEARCH ( character_to_find_the_position_of , data , [ starting_position_to_find_the_character ] ) , number_of_characters_to_separate )
The set of inputs you need to give to FIND and SEARCH is similar. You need to input the character which position you need and your data. There is also an optional input for the starting position to find the character if you need it.
Pay attention between the difference of FIND and SEARCH and use the one that suits your data processing needs!
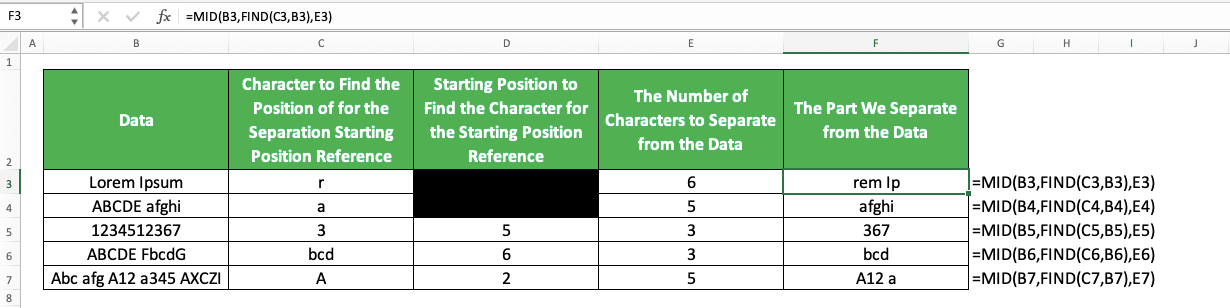
To understand the MID and FIND/SEARCH combination concept easier, here are its implementation examples in excel. We separate the example of the MID FIND and MID SEARCH implementation here.
MID FIND implementation example
MID SEARCH implementation example
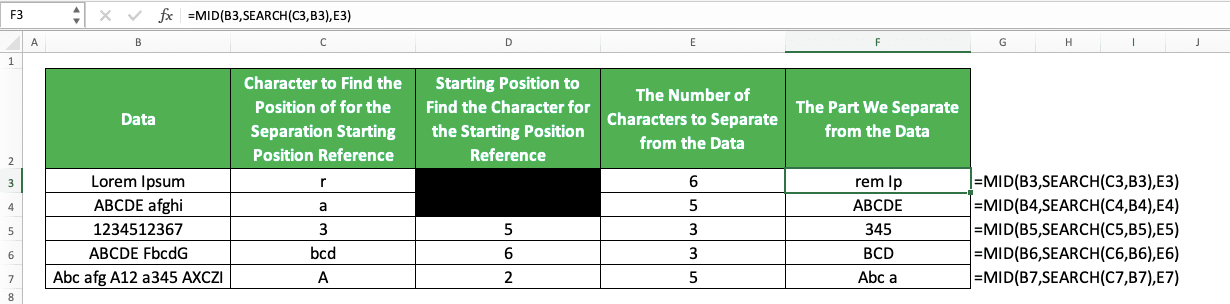
As you can see, we can use both combinations to make a character(s) position becomes our data separation starting point. By comparing those two examples, you can also see the combinations’ differences in their results.
If we use MID FIND, we can differentiate between capital and non-capital letters when searching for the character position. We cannot do that, though, if we use the combination of MID and SEARCH.
If there is no difference between the results whether we are case-sensitive or not, both results will be similar.
Get Our Data Characters Until the Last Character
Need to separate the part of our data until the data very last character? It is tricky if you use a number as your MID third input since data can be different in length. Because of that, for a much easier alternative, you should use LEN as your MID third input instead.LEN is a formula that can give you a number that represents the number of characters in your data. By using it as your MID third input, you can separate part of your data until the data very last character!
Here is the MID and LEN formulas combination’s general writing form in excel for this purpose.
= MID ( data , separation_starting_position , LEN ( data ) )
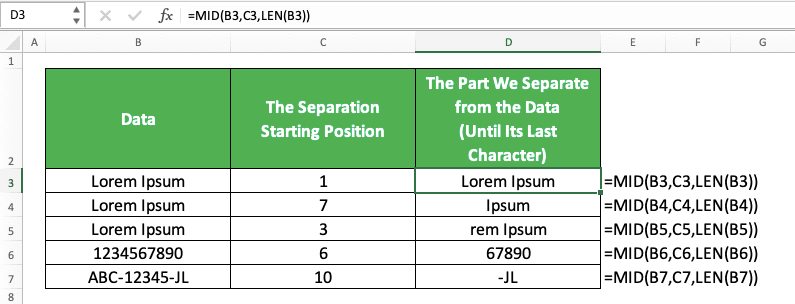
Just write LEN as your MID third input and input your data in the LEN. By doing that, you will get the length of your data as the number of characters you want to separate. Thus, you should be able to get your data part until the end of your data.
Here is the implementation example of the MID and LEN combination in excel.
Get First, Middle, and Last Names from a Full Name: MID SEARCH LEN
Need to separate the first, middle, and last names of a full name in excel? You can do that easier if you combine the writing of MID, SEARCH, and LEN formulas in excel!Here are the general writing forms to separate each name by using the three formulas’ combination.
Separate first name
= MID ( full_name , 1 , SEARCH ( “ “ , full_name ) - 1 )
Separate middle name
= MID ( full_name , SEARCH ( “ “ , full_name ) + 1 , SEARCH ( “ “ , full_name , SEARCH ( “ “ , full_name ) + 1 ) - 1 - SEARCH ( “ “ , full_name ) )
Separate last name
= MID ( full_name , SEARCH ( “ “ , full_name , SEARCH ( “ “ . full_name ) + 1 ) , LEN ( full_name ) )
As we usually separate first, middle, and last names with spaces, we use them as anchors in our formula writing here.
First, to separate the first name, we use SEARCH to determine the number of characters we should separate for it. The starting position is 1 as the first name almost always starts at the most left position of a full name.
To get the number of characters from SEARCH, we search the position of the first space in the full name. We subtract the SEARCH result by 1 to get the correct number of letters in our first name, without a space.
The most complicated formula writing is probably the one we use to separate the middle name. Here we use SEARCH in MID to determine the positions of the second and first spaces in the full name.
We use those positions to determine the position where we should take the middle name and its number of letters. For the number of letters, we determine it by subtracting the second space position with 1 and the first space position. By doing the subtraction, we will get the correct number of letters for our middle name.
And the last one, to separate the last name, we use SEARCH to determine the second space position. We add this position with one to determine the starting position where we should get our last name. For the number of characters to separate here, as the last name is until the last name character, we use LEN.
To prove that the formula writings can work, here is their implementation example in excel.
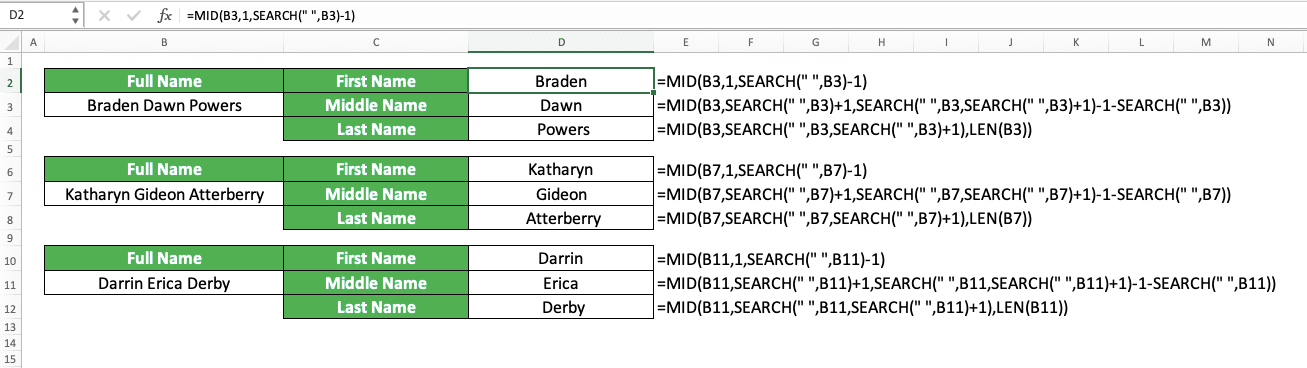
As you can see, we can separate the first, middle, and last names by utilizing the concept that we have discussed!
Get Nth Word from a Text: TRIM MID SUBSTITUTE REPT LEN
Have a long text in excel and you want to extract one word from the text using formula writing? Well, you can do that if you combine TRIM, MID, SUBSTITUTE, REPT, and LEN formulas.You should have known TRIM and LEN formulas from our previous discussion. SUBSTITUTE is a formula you can use to substitute a part of your data with another thing that we determine. Meanwhile, REPT is a formula you can use to repeat the data you want several times.
Together with MID, you can create a formula writing that can help you to separate a word from your text!
Here is the general writing form of the five formulas combination for the purpose.
= TRIM ( MID ( SUBSTITUTE ( text , “ “ , REPT ( “ “ , LEN ( text ) ) ) , ( word_order - 1 ) * LEN ( text ) + 1 , LEN ( text ) ) )
Frustrated with this long formula writing? Keep calm as we are here to help you understand it :)
Here, we use a similar basis as the one we used previously to separate names, albeit with a slightly different approach. As a text is a collection of words we separate with spaces, we utilize these spaces to get our nth word.
First, we use SUBSTITUTE to substitute spaces in our text into spaces with the length as long as our text (by using REPT as the substitute of the spaces in our text). We do this so we can use the text length as other MID inputs basis to separate the word we want.
Then, to determine the starting position where we separate our word from its text, we do this. We subtract the order of the word we want to get with 1 before multiplying the result with the text length.
This is so our starting position can be in the midst of spaces before the word we want to get. We also add the multiplication result with 1. This is so if we want the first word, then we won’t use zero as the starting point.
Next, for the number of characters we want to separate from our text, we use the text length. As we have spaces with our text length between our words, we should only get the word we want from it.
Last but not least, we use TRIM to remove the spaces we have in between the word that we have separated. As a result, we get the word we want to separate from the text!
Have you understood our discussion about the formulas’ combination concept? Here is an implementation example of the formulas’ combination in excel to help you understand the concept better.

As you can see there, we can get the nth word we want from our text by using the formulas’ combination.
Next time when you need to separate a word from your text, try to combine these five formulas to help you!
Get a Word that Contains Specific Characters: TRIM MID SUBSTITUTE REPT LEN MAX FIND
What if you want to get a word not based on its position in your text but based on its characters? Can you extract a word that contains specific characters from your text by using MID?The answer is yes, you can. Do that by combining MID with TRIM, SUBSTITUTE, REPT, LEN, MAX, and FIND! (don’t scream yet. We will explain it to you as we know this is a lot of formulas to combine)
Here is the general writing form of the formulas’ combination for the word extraction purpose.
= TRIM ( MID ( SUBSTITUTE ( text , “ “ , REPT ( “ “ , LEN ( text ) ) ) , MAX ( 1 , FIND ( character , SUBSTITUTE ( text , “ “ , REPT ( “ “ , LEN ( text ) ) ) ) - LEN ( text ) / 2 , LEN ( text ) ) )
If you have understood the discussion to separate the nth word before, then the basis for this one is similar. We replace spaces in our text with spaces with our text length in this formula writing.
Then, we find the position of the character we want in the text with those spaces. We extract the word with the character with many spaces in between them before we TRIM it to get our word.
We do those by starting with the SUBSTITUTE as our first MID input. This SUBSTITUTE replaces our text spaces with spaces with our text length (we get spaces with our text length by using REPT).
Then, as the MID separation starting position input, we use MAX which has 1 and FIND formula inputs in it. With FIND, we want to find our character position in our text that has lots of space.
After we get the position using FIND, we subtract it with our text half length. This is to ensure we have our starting position around the middle of the spaces before our preferred word (the word with the character that we want).
We have 1 in MAX because we anticipate a minus from our FIND subtraction result. If the word with the character is our text’s first word, then we will get that kind of result. If we use MAX with the 1 input, it will replace the minus result with 1.
Then, as the number of characters input in our MID, we input our text length. As our text has text length spaces between its words, we should only get our preferred word with spaces from that.
The result from our MID is the word with the character we want in the middle of a lot of spaces. We use TRIM to remove those spaces and we will only get the word with the character we want!
Need an implementation example to help you understand the concept? Here is one for you.

In this example, we want to get the word with a $ symbol in it from each text in each row. As you can see there, we can get the word by combining formulas as we have discussed before.
Get a Number from MID: VALUE MID
Normally, we get text data type from the MID formula that we write in excel. If we get a number text and we want to immediately convert it to a numeric value, we should use VALUE.We can use the VALUE formula by inputting our MID formula writing to it. Here is the general writing form of the VALUE and MID combination in excel.
= VALUE ( MID ( data , separation_starting_position , number_of_characters_to_separate ) )
Simple, isn’t it? And here is its implementation example in excel.
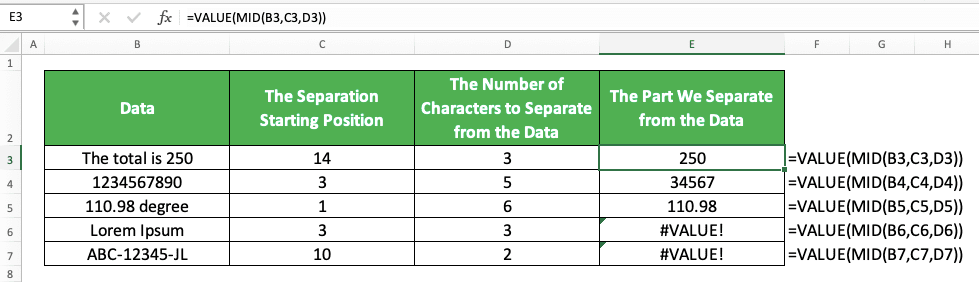
As you can see there, we will immediately convert our number from MID to a numeric value if we use VALUE. If we get non-number data from MID and we apply VALUE to it, then we will get a #VALUE error.
Whenever you have a number result from your MID and you want to convert it to a numeric value, use VALUE!
Exercise
After you learned how to use MID in excel completely, you can practice your understanding through this exercise!Download the exercise file below and answer the questions. Download the answer key file if you have done the exercise and want to check your answers
Link to the exercise file:
Download here
Questions
Use MID to get the answer to each question! Answer in the gray-colored cell of the appropriate row!- Get the first name of the person!
- Get the middle name of the person!
- Get the last name of the person!
Link to the answer key file:
Download here
Additional Note
Be careful when choosing to combine your MID with SEARCH or FIND to separate part of your data. The wrong choice of formula can make you get the wrong result!Related tutorials you should learn too: