Usage and Function of Wrap Text in Excel
Home >> Excel Tutorials from Compute Expert >> Excel Tips and Trick >> Usage and Function of Wrap Text in Excel


In this tutorial, you will learn completely the definition, usage, and function of wrap text in excel. This wrap text feature can be important to manage your data display in excel more optimally.
Disclaimer: This post may contain affiliate links from which we earn commission from qualifying purchases/actions at no additional cost for you. Learn more
Want to work faster and easier in Excel? Install and use Excel add-ins! Read this article to know the best Excel add-ins to use according to us!
Table of Contents:
What is Wrap Text in Excel?
Wrap text is an adjusting feature between your text length and the column width of the cell where your text is.Wrap Text Function in Excel
The wrap text feature helps us make a text not too long in its display. Thus, we can see its content much easier in its cell. This feature does it by dividing a text which is too long for its column width into several different lines.By default, Excel will show our text data in one line in its cell, however long the text is.
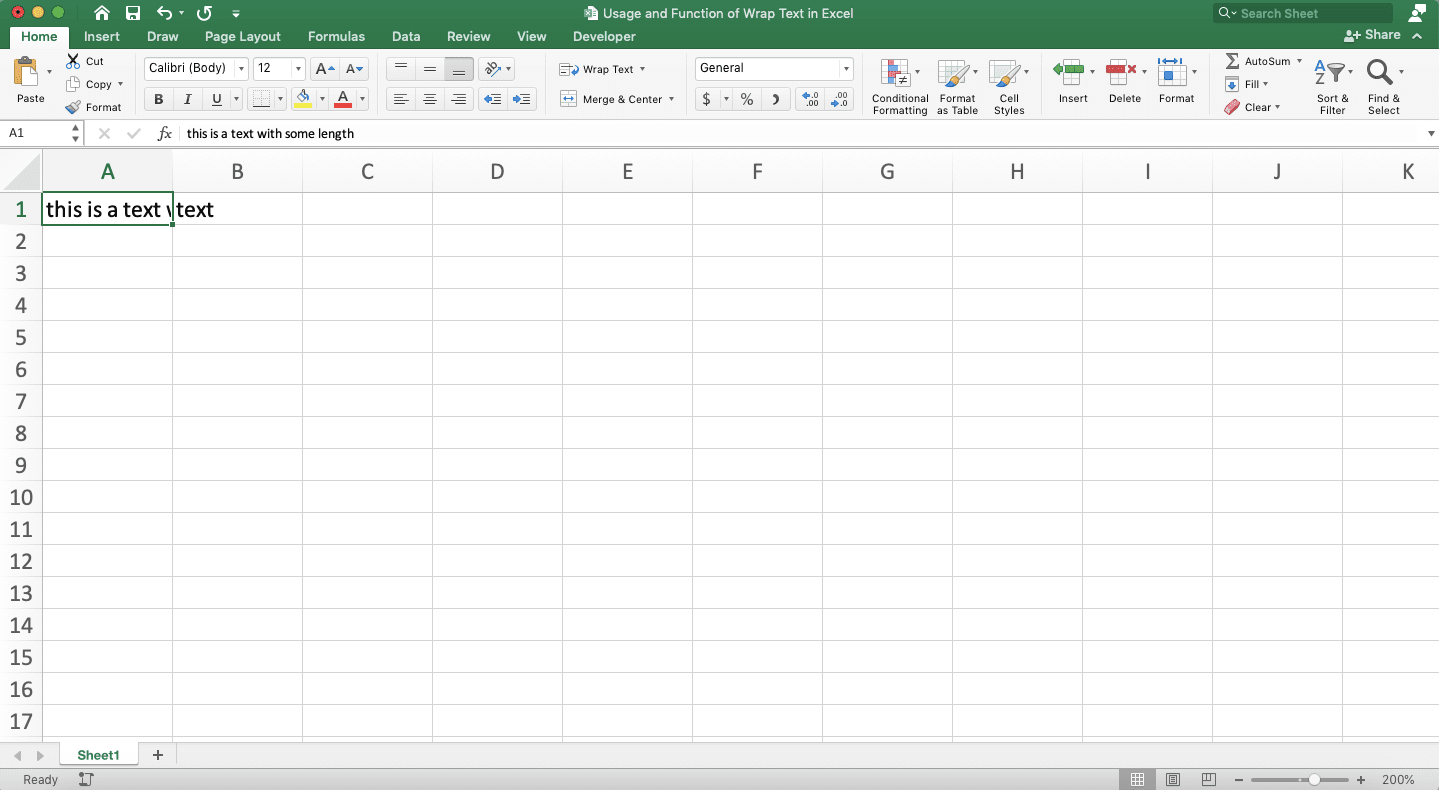
We can still see the whole long text content if the cells on the right of the text cell are empty. But, if they aren’t, then the text display will be cut. This is where wrap text comes in. It can help us to show the whole content of the text when we use it.
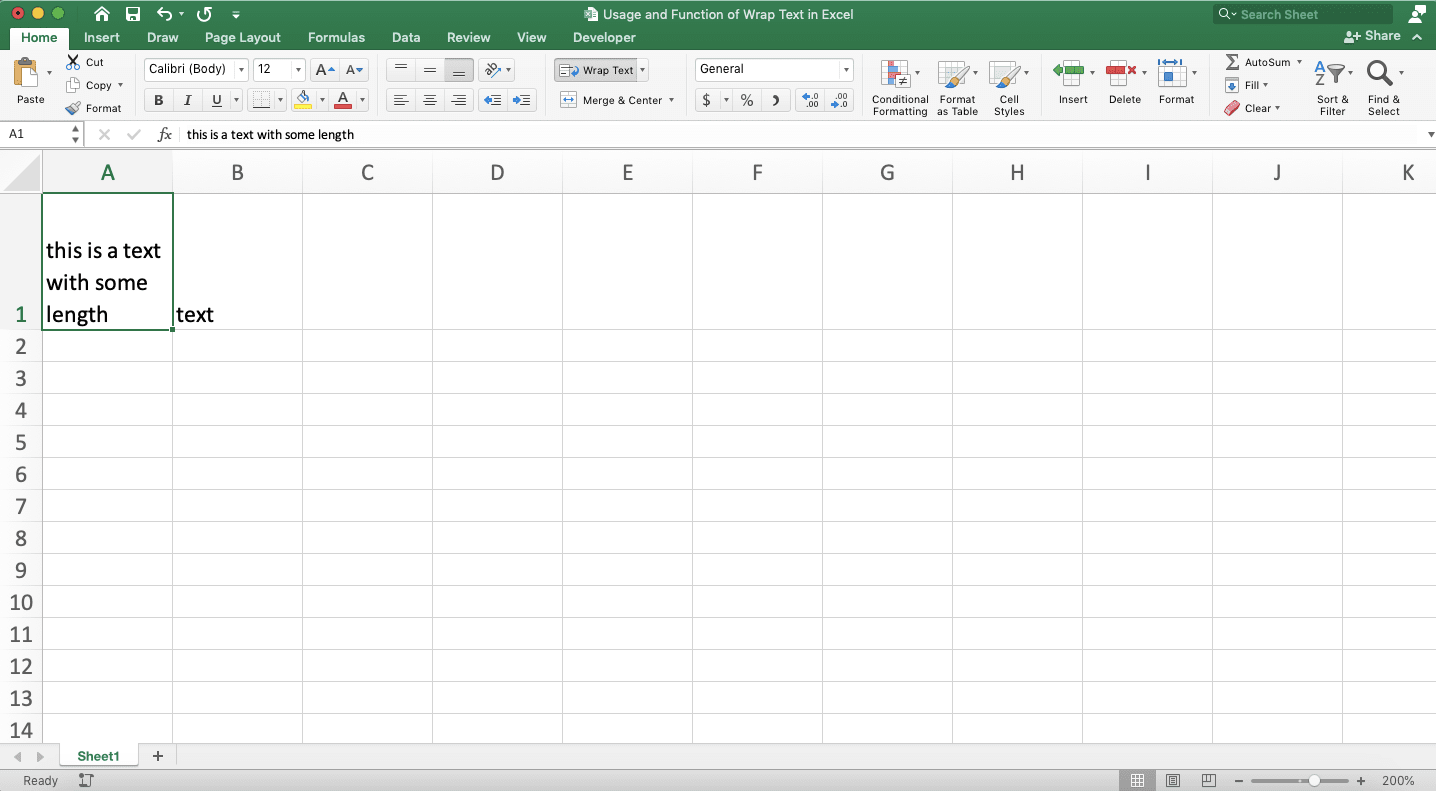
As an example of the function, let’s say we have text data as shown in the screenshot below.

The text there looks cut because its length is greater than its column width and there is data on the right. What can we do so we can show the whole text easily?
If you don’t want to widen your column, then you can activate wrap text on the cell containing the text. By using the wrap text feature, excel will divide your text form into several lines
The number of lines depends on the column width where your text cell is and the text length too. Excel will automatically add the cell row height until we can see the whole text in its cell.

Cell with wrap text will always adjust its data lines and row height to the column width and data length. If you update the data content, then the number of data lines and row height will also change automatically if needed.
How to Use Wrap Text in Excel 1: Button in the Home Tab
After discussing the function of the wrap text feature in excel, next, we will talk about the steps to use it. There are three methods explained here with their usage steps.We will begin with the first method, which is by using the button in the Home tab to activate wrap text.
-
Highlight the cell with the data content where you want to activate the wrap text on

-
Make sure you are already in the excel Home tab. Then, click the wrap text button which location is shown in the following screenshot

-
Done!
How to Use Wrap Text in Excel 2: Shortcut (Only for Windows)
If you want to do wrap text fast without using your mouse, then apply the use of these shortcut buttons. This shortcut only works for computers with Windows operating system.-
Highlight the cell with the data which you want to activate the wrap text on

- Press Alt then H and then W (in sequence, not simultaneously)
-
Done!

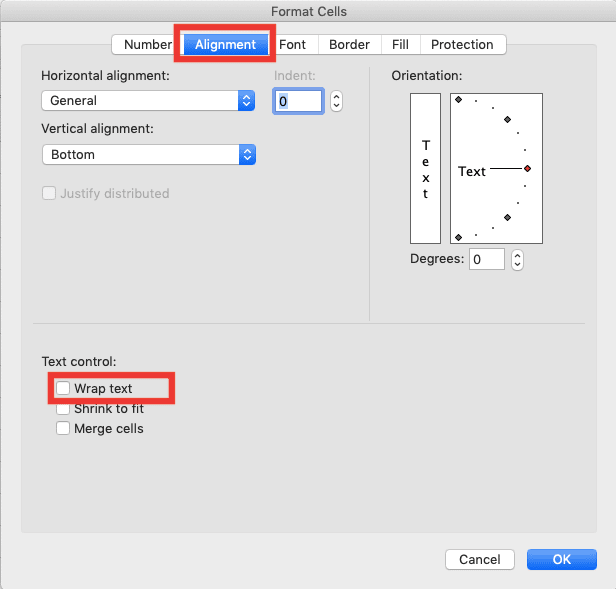
How to Use Wrap Text in Excel 3: Format Cells
The last method is by utilizing the format cells feature in excel.-
Highlight the cell containing the data you want to activate the wrap text feature on
-
Press Ctrl + 1 or right-click on the cell and choose Format Cells
-
Go to the Alignment tab in the dialog box shown. Then, check the wrap text checkbox there
-
Click OK

-
Done!

Alternative: How to Wrap Text Manually
Not satisfied with the text lines setting from wrap text and want to set the lines in your text manually? You can do that by implementing how to enter in your text. You can enter by pressing the Alt + Enter (Option + Enter in Mac) buttons. Do that when your typing cursor is in front of the text part you want to be in a new line.As an example, let us go back to the text example where we implement the wrap text feature previously. If we want to wrap text manually on it, then do this. Place our typing cursor in front of the text part which we want to be in a new line.
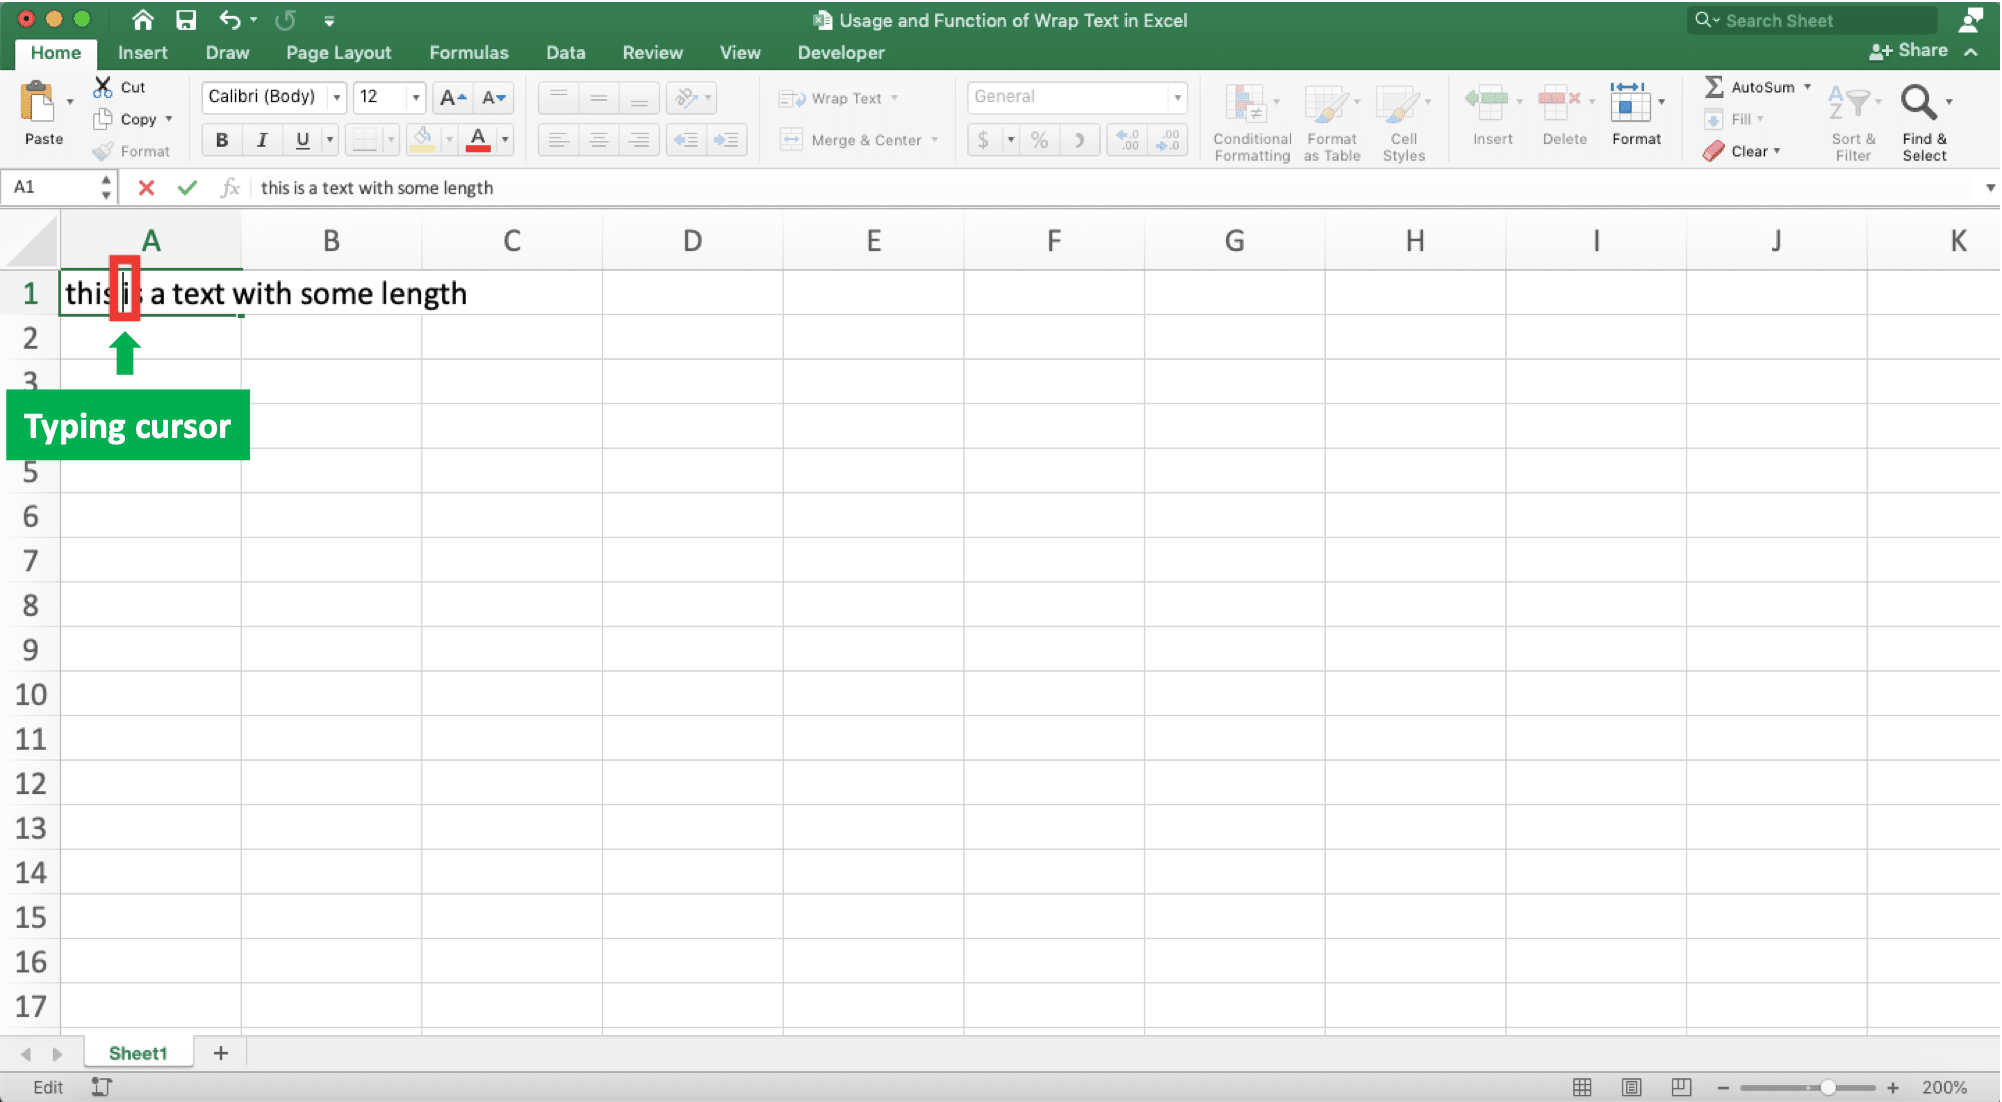
Then, press the Alt + Enter buttons like what we discussed earlier. The text behind your typing cursor will be moved into a new line!

Excel automatically adjusts the row height and activates wrap text for other parts of the text after you press Alt + Enter. If you want to set the lines again, place your typing cursor in the text and set it as you prefer.
The Reasons Why Your Wrap Text Doesn’t Wor
You feel you have activated the wrap text feature but your text still doesn’t show its whole content? Or you might have used wrap text but your text doesn’t separate itself into several lines?Various factors can become the causes here. However, you might need to check the points below first, which often become the factors that cause wrap text not working.
-
The row height isn’t enough to show the whole text
Check the row height where you activate the wrap text. Maybe, you have unintentionally changed the row height so your text becomes invincible again.
If that is what happens, immediately add more row height until you can see the whole content of your text -
Your cell is a result of some cells combination/merge cells
Try to check the cell where you wrap text and see whether your cell is a result of using merge cells.
If yes, then know that excel cannot automatically widen that cell row when you activate wrap text. You need to widen it yourself so you can see the whole content of your text -
Your column width is already enough to show the whole text
If your text doesn’t separate itself into several lines, then try to check the column width where your cell is. Is the column wide enough to show all your text? If it is, then wrap text won’t separate your text into some lines.
The wrap text objective is to make your whole text shown in the cell where it resides. If that already happens with your column width, then wrap text doesn’t need to separate your text into several lines.
If you still want to separate your text into lines with wrap text, then narrow down your column to do that. Or, probably, try to wrap text manually with the method explained above.
Have you checked all the points above? If your wrap text doesn’t work, then most probably one of those points is the cause!
Additional Note
Consider merging cells also to show the data in your cells. Sometimes, it is better to show them this way rather than using wrap text.Related tutorials for you to learn: